Deep cycle batteries are one of the most common types of batteries. They are often used in marine applications that require long-hour battery voltage maintenance. If you are here to learn how to charge a deep-cycle battery, you’ve come to the right place!
The deep cycle battery’s design is relatively different from regular vehicle batteries. Therefore, it might mess with your head a little bit if you are inexperienced in the field. This post will walk you through every step and give you the foundation knowledge you need.
Now let’s get right into it!
What Is A Charge Deep Cycle Battery
Before getting into the main topic of guiding you on how to charge a deep-cycle marine battery, we will start with some basic concepts first. So, what is a deep charge cycle, and how different is it from other battery types?
Each type of battery has its unique function that serves a certain purpose; deep cycle batteries are no exception. They are the ultimate options for any motor that needs power stability to extend the operation time. For that reason, they are often used in marine applications.
When it comes to boats, the battery’s main job is to generate power to maintain the lights and motor operation constantly. A steady battery can prevent the light’s dimness and instrument-related errors.
A deep cycle battery can perform excellently in all the requirements above; its optimum battery voltage maintenance can extend the use time and maintain the light’s brightness.
Besides, deep cycle batteries remain the same charging capacity for long periods as they reduce the battery’s memory loss.
On the other hand, vehicles on land require burst power instead of steady power. As opposed to steady power, burst power requires a high amperage that only lasts for a short amount of time to ignite the engine instantly.
Based on the power strength that deep cycle batteries provide, you might ask yourself “how long will a deep cycle battery will last?”. Depending on the frequency of use and the maintenance, your battery can last for four to six years.
To prolong the battery’s lifespan, you need to understand the battery charging cycles. Based on these cycles, you can figure out when you should charge your battery. The right charging way to extend its life is to give it a full charge in a complete cycle every day.
How To Charge A Deep Cycle Battery Properly
Basic Steps
#1 – Prepping Time
1. Prepare The Battery
The battery’s overall condition is the very first thing to prepare in any charging process, before connecting the battery with a charger, giving it a visual inspection for unwanted errors might be a good thing to start with.
If you notice any sign of those mentioned below, you shouldn’t move on to the next step:
- Since most deep cycle batteries carry water inside, you have to make sure the liquid level is adequate.
- Look for any cracks around the battery housing to prevent leaking.
- The battery surface should be free of corrosion or oxidation.
If your battery has any of those issues, it would be best to repair or replace it first. The most common error that people often come across is the lack of liquid. Make sure you add a proper amount of distilled water inside the battery before charging it.
2. Select The Charger With A Compatible Capacity
As mentioned above, the battery amperage can determine the battery capacities. Some of the most common outputs are ten amps (240 volts) and 15 amps (150 volts).
Besides, you should check for any frayed wires in the charger, as They can destabilize the power current and cause irregular electricity generation.
3. Make Sure The Battery Is Disconnected From The Boat
To prevent any electrical damage from happening, make sure to separate the battery after the visual inspection of the application’s systems.
Most people believe that you need to wait until the battery runs out completely to disconnect and charge it back up, which can lengthen the battery lifespan. However, this idea is not true since a full discharge is no longer necessary.
Instead, we highly recommend you start charging your battery when it reaches 50% or a little bit lower. Try not to let the remaining power dip too low because it will only wear out the battery sooner.
#2 – In Action
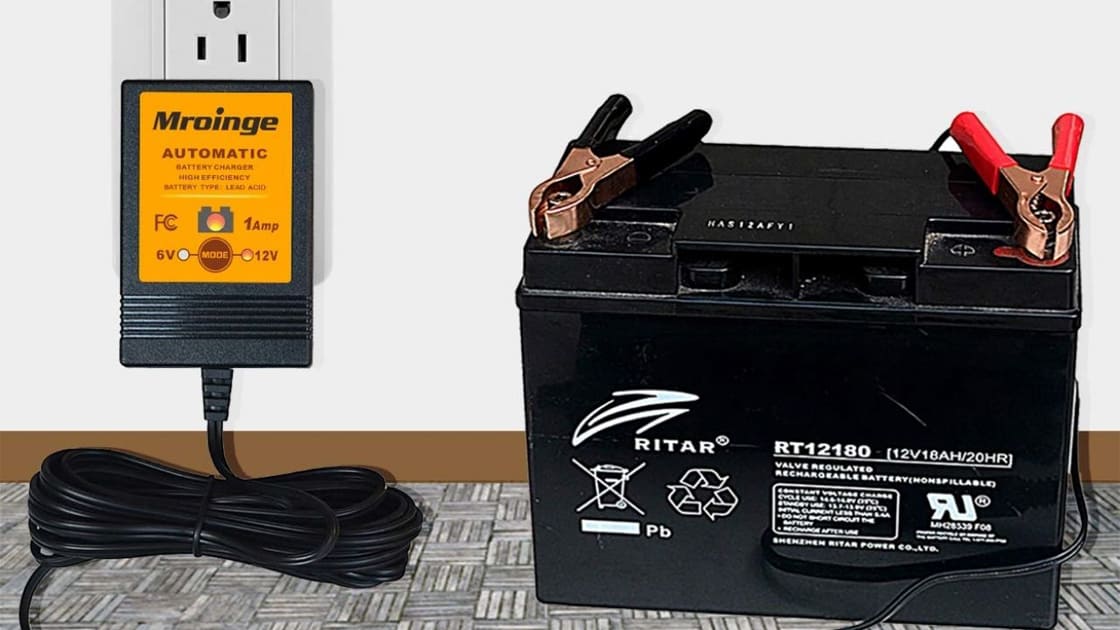
- After inspecting the battery condition, it’s time to put on some protective gear (eyewear, rubber gloves) to start working on the terminals.
- Look for the positive terminal on the battery, which is usually labeled with a plus sign, and clip the charger’s red clamp. An alarm will alert you when the clip is attached to the wrong terminal on a more modern version.
- Now, you need to continue by clipping the other clamp (usually painted in black) to the negative terminal.
- After the battery is connected to the charger, join the charger to the compatible power outlet of about 110 to 120VAC.
Those are steps that you should follow to prolong your battery life. Now your only job is to wait until your battery is full, then turn it off and disconnect the charger from the outlet.
Most deep cycle batteries will turn to the float charge stage when the battery is full, so you won’t have to set a timer to know the finishing time.
How to Maintain and Use AGM Deep Cycle Batteries
How Long Should You Charge A Deep Cycle Battery
Even though there’s no need to set a certain time to disconnect the charger, it is good to estimate how long you charge a deep-cycle battery.
Generally speaking, a 15-amp charger (150 volts) will take approximately two hours to reach a 100% charge rate. In contrast, a five-amp charger will take more time to charge a battery, which is about six hours fully.
To know exactly how long it takes to charge a deep cycle battery at 10 amps (240 volts) or 20 amps (150 volts), you have to do quick math to figure out the result.
Besides, most in good condition batteries will have a discharge rate of 25%, so you will also know how to recharge a deep cycle battery at the right time.
Related:
- How Long Does It Take To Charge A Car Battery? Detailed Answer
- A Detailed Guide On How To Test Batteries With A Multimeter
- How To Recondition A Car Battery – A Comprehensive Guide
- How To Charge A Car Battery At Home? Reasons For Charging Failure & FAQs
What You Should Know Before Charging Deep Cycle Battery
#1 – Types Of Charger
There are a wide variety of available chargers in the market that you can choose from. However, not all of them are suitable for your deep-cycle battery.
An unsuitable charger can shorten the battery’s lifespan and performance, while the right one can significantly improve its quality.
Due to this reason, you should ask yourself this question before picking a new charger: what is the best choice that you can make?
Deep cycle batteries include two types: AGM and GEL. Due to the nature of AGM and GEL, you should not charge deep cycle batteries with regular chargers since they have a high amperage percentage.
This charger type will fully charge your battery in a short amount of time and slowly damage the AGM and GEL batteries. So, we highly recommended you use modem cycle battery chargers specifically designed for AGM and GEL.
The most remarkable difference between a deep cycle and a standard battery charger comes from the charging speed. Regular battery chargers for flooded batteries in cars, and trucks can be charged quickly at a higher speed, but AGM and GEL batteries should be charged slowly. Now let’s take a deeper look into each type of charger and take them in comparison.
AGM and GEL portable battery charger: There are two fundamental differences between the two of them.
- Firstly, they can regulate the charging rate. Your battery will be charged to its full extent within a reasonable amount of time to ensure there is no overloading, overheating, or overcharging.
- The charging cycle of AGM chargers is more complicated and divided into three stages:
- Bulk Charge Stage: This is the first and most essential stage of the three. The charging rate is regulated to prevent any premature battery damage and overheating problems with the battery.
- Absorption Charge Stage: A battery enters the absorption charge stage when the battery rate reaches 80%. The power intensity of the current will be automatically reduced until the battery is full.
- Float Charge Stage: The charger will stop working and focus on maintaining the battery at a 100% charging rate. You can add trickle chargers to compensate for the battery discharge rate.
Regular Chargers: As we mentioned quickly above, this type of charger only works for flooded batteries. Its high-amp charging speed can lead to premature damage and constant overheating in the battery core.
Additionally, regular chargers can’t automatically regulate the charging rate and stop when the battery is full. You will have to set the timer to disconnect the charger by yourself.
#2 – The Capacity Of The Charger
Another thing that you should pay attention to is the battery capacity of the charger, as it can directly affect the efficiency of the charging process. Their ratios determine the appropriate sizes with the battery’s maximum amperage.
More specifically, a battery charger’s capacity should be as much as 10 to 25% of the battery capacity. Thus, if you have a battery with a 100 amp-hour battery, you should opt for a 10 to 25-amp charger.
#3 – The Temperature Compensation Feature
It might come as a surprise to many people that the temperature can affect the charging performance significantly. In low-temperature weather, the battery capacity tends to shrink.
The most common example is the struggle people often have when igniting car engines in cold temperatures.
In contrast, when the temperature gets higher, the battery capacity will also increase. However, when the weather gets too hot, the battery lifespan will also be shortened.
Thus, you should make sure that your charger can compensate for the extra heat or the lack of heat to regulate the charging rate and keep the work going regardless of the weather condition.
The Bottom Line
Our detailed guide on how to charge deep-cycle batteries has finally drawn to an end. Besides the step-to-step process, we also provide you with some basic information about the topic. We hope you can get something out of this post and apply it to real life.
Furthermore, you should pay attention to a few factors mentioned above to ensure a proper charging process. Make sure that you remember notes about choosing the suitable charger and the maximum charging time.
All in all, we wish you luck, and don’t forget to drop by for our future articles!
WHAT'S NEW
The best AGM battery chargers will be the ideal option to revive your flat battery without relying on professional help. These handy high-tech chargers are extremely beneficial because they offer...
The Genius Boost GB40 is popular because of its ability to help boost your vehicle when it has battery issues. Many of our customers wonder why the Noco GB40 can work greatly like so. So, we have...