The usage of products with battery-based operations is increasing. As a result, the demand for multimeters is also growing exponentially. Though it is the ultimate gear to check the battery condition, how to test batteries with a multimeter is not that easy.
Despite its importance, many people don’t know how to check the battery with a multimeter properly. This article is dedicated to the inexperienced in need of a detailed guide. Now let’s get right into it!
How To Use A Multimeter To Test A Battery
Before diving into how to test batteries with a multimeter, you should keep in mind that the steps can only be applied to maintenance-free batteries.
#1 – First of all, make sure there are no battery charges on the surface. Learning how to check battery charges with a multimeter is fairly easy.
By switching on the car headlights and waiting for a few minutes, most of the remaining battery charge in the alternator will be gone.
#2 – The next thing to do before learning how to check batteries with multimeters is to search for any build-up crust on the terminals. A corrosive metal surface can negatively affect the reading results when you practice how to use a multimeter to check the battery.
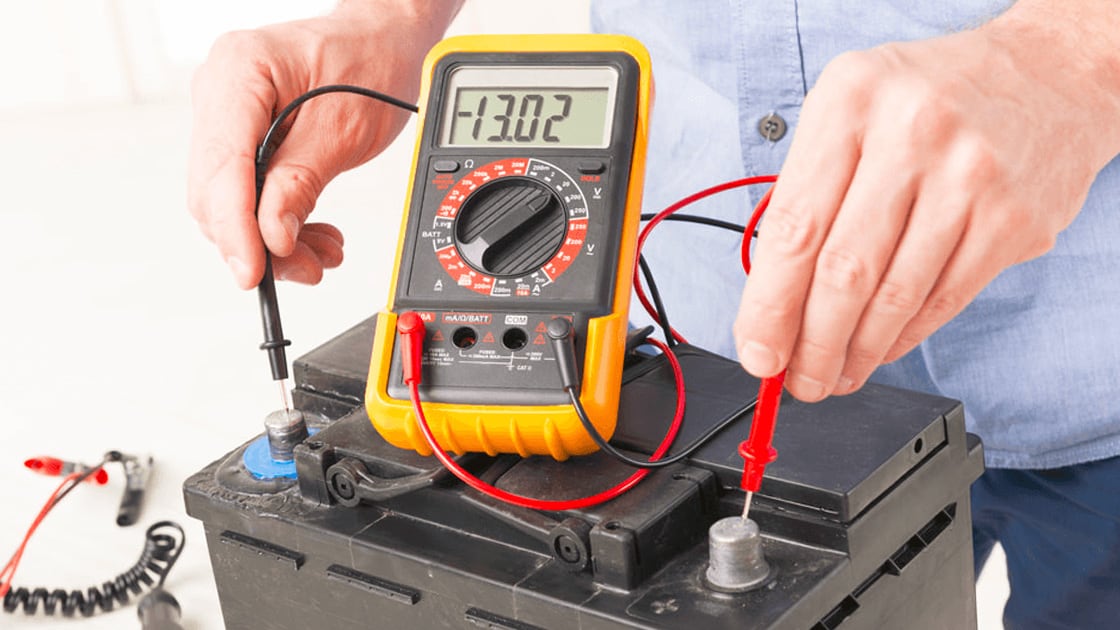
#3 – Now that the preparation is done, it’s time to turn off the system and set the multimeter from 15V to 20V DC.
#4 – Connect the probes of the multimeter with the appropriate terminals. Two negative ends and two positive ends must be paired with one another.
#5 – After that, you want to check your multimeter screen. The maximum voltage of a fully-charged battery ranges from 12.5V to 12.6V. If the battery is colder, there will be a slight decrease in the voltage measurements.
#6 – To wrap everything up, you should learn how to check for battery drain with a multimeter.
You can do that by checking the voltage on a running engine while the multimeter is still on. If the battery voltage is below 10, the car will not be able to operate properly.
How To Check Battery Voltage Using a Multimeter
Knowing how to test battery voltage with a multimeter is vital while learning how to test battery capacity with a multimeter.
You can start practicing how to check the battery voltage with a multimeter on your application by following the steps below. This guide is specific to how to test a 9V battery with a multimeter, but you can apply them to every other battery kind.
#1 – Begin with ensuring that your multimeter is set to DC voltage before learning how to check battery voltage using a multimeter. It is mainly because the battery only creates DC power.
#2 – Since the 9V battery has a maximum voltage of 9V, we adjust the dial to 9V. If you use the battery with a higher voltage, modify the dial until it matches.
#3 – Following up, you want to connect the black probes to the battery. The black end must be linked to the negative terminal, while the red end goes with the anode.
#4 – Now it’s time to give the engine an overall inspection while the multimeter is still attached. The display of a well-functioned battery should show up a value of 8.7V to 9V.
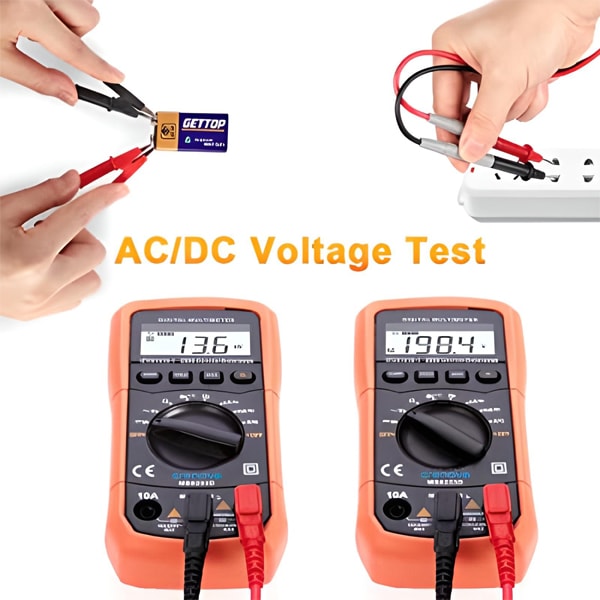
AC/DC Voltage test with a multimeter
How To Check Battery Amps With A Multimeter
In this part, we will talk about how to test car battery amps with multimeters since it is one of the basic knowledge if you want to learn how to check battery capacity with a multimeter.
#1 – Even though you are not testing the voltage, the multimeter’s current function must be set to DC at 200mA.
#2 – The next step is to connect the multimeter probes to the battery. The setting is identical to that of voltage measurement.
#3 – Now it’s time you checked the multimeter display screen. If the dial fluctuates between 98 mA to 100 mA, the battery is in good condition.
Besides that, there are a few things to keep in mind when measuring battery amps with multimeters.
- If the amp read using a multimeter does not show any bad signs, but your application is malfunctioning, the issue may stem from the battery’s attachment to the load.
- If the final read displays an amp measurement that is only half of its standard, we highly recommend getting a new battery for your application.
How To Use A Multimeter To Check A Car Battery
One of the most common applications of multimeters in daily life is on cars. Therefore, we should touch on the basics of how to use a multimeter to test a car battery to make sure it is done in the right way.
The multimeter comes to the rescue in many different real-life scenarios. If you encounter engine problems that slow down the car engine or the headlights suddenly become dim, using a multimeter is highly recommended.
Also, it is a competent tool to check the overall battery health of heavy-duty vehicles and alternators.
With most cars, the battery status will be displayed on the dashboard, and you can check the car’s condition right away. However, when your vehicle completely runs out of gas, you need a multimeter to help you do the job.
If you’re in a pinch and digital multimeters are not available at the moment, you can opt for a mechanical voltmeter instead.
With a different name, people might not know how to test a car battery with a voltmeter. However, it is just a simpler version of multimeters and can be used similarly.
Generally speaking, checking car batteries is just a more specific practice of the general guidelines we provided previously on how to use a multimeter to test a battery.
The battery values vary from car to car, so the voltage range you can set for the multimeter is quite broad, ranging from 15V to 20V.
If the final read is above 12V, which is the minimum value, your battery is in good condition and will likely last for a few more years.
How To Test Cold Cranking Amps With A Multimeter
The preparation steps for checking cold-cranking amps are identical to that of amp testing. After setting the multimeter to DC, you join the multimeter probes to the battery terminals and start the engine to get the read.
You might need company when doing this step since there should be someone in the car to kick off the engine, while you are at the car hood to check the multimeter.
While the car system is operating, you want to look at the multimeter display. If it points at 10V for a few seconds and moves up to a higher value of 11V to 12V, there is no issue with the car battery.
On the other hand, if the read stays at 5V and becomes stagnant, the battery lifespan will probably be shortened. The reason for that is the battery will wear out much quicker if the voltage measurement decreases to the midpoint.
When checking the multimeter display, some people might be too rushed and read the value right away. However, these results might not be correct. It’s advisable to only read the display when the numbers become constant while the car engine is still on.
Related:
- What Is Car Battery Voltage? – For A Healthy Vehicle
- How To Add Water To A Car Battery? Step-By-Step Guides To Follow
- How To Read Car Battery Date Codes? A Simple And Detail Instruction
How To Test A Car Battery Without A Multimeter
Checking the battery with a multimeter is effortless and easy, but sometimes the situation doesn’t allow you to use one. If that’s the case, this guide we provide on how to check a car battery without a multimeter will help you out in those times.
#1 – Firstly, it is important to take a quick look at the battery’s current condition. There should be no leaking, corrosion, or displacement since they can lead to false final reading results.
#2 – After the visual inspection, you may want to turn on the car headlights while keeping the engine off for about 15 minutes.
#3 – With the headlights still on, now you start the engine and check the lights. When the car first kicks off, there will be a slight dimming of the bulbs.
If the dimming’s brightness is weak, doesn’t appear, or takes a long time to appear, your vehicle probably has some battery issues.
The Bottom Line
It is eventually the end of our detailed walk-through on how to test batteries with a multimeter. The checking process will get easier as you keep practicing and get used to the steps.
To be more well-versed in dealing with different kinds of cells, we highly recommend you practice with multiple applications around the house. It can give you a broader understanding of charge positions for better handlings.
All things considered, we wish you luck with your journey and hope to see you in our next post!
WHAT'S NEW
The best AGM battery chargers will be the ideal option to revive your flat battery without relying on professional help. These handy high-tech chargers are extremely beneficial because they offer...
The Genius Boost GB40 is popular because of its ability to help boost your vehicle when it has battery issues. Many of our customers wonder why the Noco GB40 can work greatly like so. So, we have...